AWS App Runner: Simplified Container and Source Code Deployment
Learn how to use AWS App Runner to deploy and run containerized web applications and APIs with automatic scaling and load balancing
AWS App Runner: Streamlined Container and Source Code Deployment for Production
AWS App Runner is a managed service designed to simplify the deployment and scaling of containerized web applications and APIs. This guide provides a deep dive into its capabilities, common use cases, and recommended operational patterns for experienced engineers.
TL;DR: App Runner automates the build, deployment, and scaling of web applications from source code or container images, abstracting away much of the underlying infrastructure management. It's ideal for stateless web services and APIs where rapid iteration and simplified operations are prioritized.
Service Overview
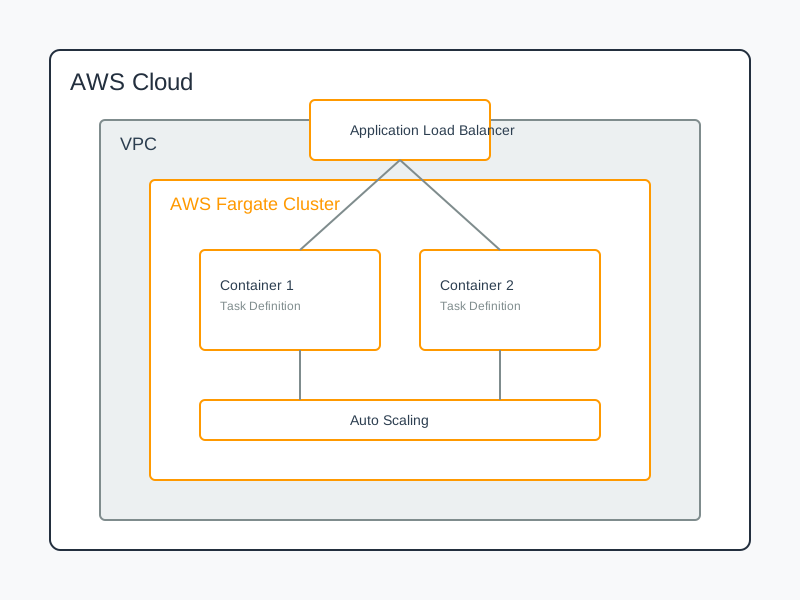
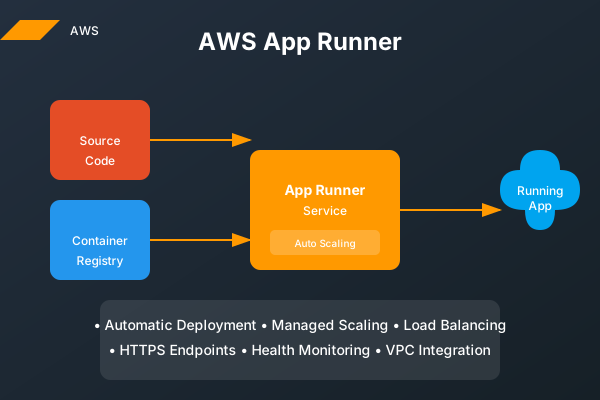
AWS App Runner abstracts the complexities of container orchestration, build pipelines, and runtime management. It offers a fully managed experience for deploying and running web applications and APIs.
Deployment Options
App Runner supports two primary deployment sources: direct integration with source code repositories and deployment from container images in registries.
1. Source Code Deployment
App Runner can directly build and deploy applications from supported source code repositories (e.g., GitHub). It automatically detects the runtime, builds the application, and deploys it.
Example Node.js Application:
// app.js
const express = require('express');
const app = express();
const port = process.env.PORT || 8080; // App Runner injects PORT

app.get('/', (req, res) => {
  res.json({ message: 'Hello from App Runner Source!' });
});

app.listen(port, () => {
  console.log(`Server running on port ${port}`);
});
App Runner Configuration File (apprunner.yaml
This file allows for customization of the build and run commands.
# apprunner.yaml
version: 1.0
runtime: nodejs
build:
  runtime-version: "18" # Specify runtime version if needed
  commands:
    pre-build: # Optional: Commands to run before the build phase
      - npm ci # Use ci for deterministic installs
build: # Commands to build the application artifact
  commands:
    - npm run build # Example for frameworks like React, Vue, etc.
run: # Commands to start the application server
  command: "npm start" # Assumes 'npm start' is defined in package.json to run app.js
  network:
    port: 8080 # App Runner assigns a dynamic PORT, this is the port your app listens on.
Key Points for Source Deployment:
- Runtime Detection: App Runner has built-in support for common runtimes. Explicitly defining and
runtimeinruntime-versionis recommended for clarity and predictability.apprunner.yaml - Build Artifacts: For compiled languages or front-end frameworks, the phase in
buildis crucial for generating deployable artifacts.apprunner.yaml - Port Binding: Applications must listen on the port specified by the environment variable injected by App Runner, or a port explicitly configured in the
PORTunderapprunner.yaml.run.network.port
2. Container Deployment
Deploying from a container image stored in a registry like Amazon ECR simplifies the process further if you already have containerized applications.
Example Dockerfile:
# Use an official Node.js runtime as a parent image
FROM node:18-alpine as builder

WORKDIR /app

# Copy package.json and package-lock.json
COPY package*.json ./

# Install dependencies
RUN npm ci

# Copy application source code
COPY . .

# Build the application (if applicable, e.g., for front-end frameworks)
RUN npm run build

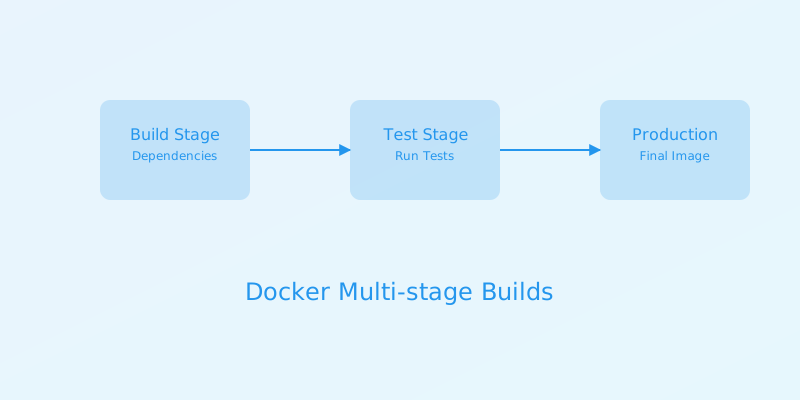
# --- Production Stage ---
FROM node:18-alpine

WORKDIR /app

# Copy only necessary artifacts from the builder stage
COPY --from=builder /app/package*.json ./
COPY --from=builder /app/node_modules ./node_modules
COPY --from=builder /app/dist ./dist # Example for built assets
COPY --from=builder /app/app.js ./app.js

# Expose the port the app runs on
EXPOSE 8080

# Command to run the application
CMD [ "npm", "start" ] # Assumes 'npm start' in package.json runs app.js
Key Points for Container Deployment:
- Image Tagging: Use specific tags (e.g., commit SHAs, semantic versions) instead of for reproducible deployments.
latest - Port Exposure: The instruction in the Dockerfile is informational; App Runner uses the
EXPOSEsetting during service creation to know which port to target.ImageConfiguration.Port - Minimal Base Image: Utilize Alpine or slim variants of base images to reduce image size and attack surface. Multi-stage builds are highly recommended.
Infrastructure as Code (IaC)
Managing App Runner services with IaC ensures consistency, repeatability, and version control.
AWS CDK Implementation
import * as apprunner from '@aws-cdk/aws-apprunner-alpha';
import * as ecr from 'aws-cdk-lib/aws-ecr';
import * as cdk from 'aws-cdk-lib';
import { Construct } from 'constructs';

interface AppRunnerServiceProps extends cdk.StackProps {
  readonly repository: ecr.Repository;
  readonly imageTag?: string;
}

export class AppRunnerStack extends cdk.Stack {
  constructor(scope: Construct, id: string, props: AppRunnerServiceProps) {
    super(scope, id, props);

    const service = new apprunner.Service(this, 'MyWebAppService', {
      source: apprunner.Source.fromEcr({
        repository: props.repository,
        tag: props.imageTag ?? 'latest', // Default to 'latest' if not specified
        imageConfiguration: {
          port: 8080, // The port your container listens on
          // environment: {
          //   'NODE_ENV': 'production',
          // },
          // Optional: health check configuration
          // healthCheck: {
          //   path: '/health',
          //   interval: cdk.Duration.seconds(30),
          //   timeout: cdk.Duration.seconds(5),
          //   unhealthyThreshold: 3,
          //   healthyThreshold: 2,
          // }
        },
      }),
      # Optional: Configure auto-scaling
      # autoScalingConfiguration: new apprunner.AutoScalingConfiguration(this, 'AutoScaling', {
      #   minSize: 1,
      #   maxSize: 5,
      #   maxConcurrency: 100,
      # }),
      # Optional: Configure VPC connector for private access
      # vpcConnector: apprunner.VpcConnector.fromVpcConnectorArn(this, 'VpcConnector', 'arn:...'),
      instanceRole: undefined, # Specify if your app needs to access other AWS services
      serviceName: 'my-production-api',
      # observabilityConfiguration: {
      #   // Enable X-Ray tracing
      #   traceConfiguration: apprunner.TraceConfiguration.awsXRay(),
      # },
    });
  }
}

// Example usage in your app.ts
const app = new cdk.App();
const repository = ecr.Repository.fromRepositoryName(app.stack, 'MyEcrRepo', 'my-app-repo');
new AppRunnerStack(app, 'AppRunnerStack', { repository });
AWS CloudFormation Template
AWSTemplateFormatVersion: '2010-09-09'
Description: AWS App Runner Service deployment

Resources:
  AppRunnerService:
    Type: AWS::AppRunner::Service
    Properties:
      ServiceName: my-containerized-api
      SourceConfiguration:
        ImageRepository:
          ImageIdentifier: !Sub '${AWS::AccountId}.dkr.ecr.${AWS::Region}.amazonaws.com/my-app:v1.0.0' # Use specific tag
          ImageConfiguration:
            Port: '8080' # Port your container listens on
            # RuntimeEnvironmentVariables: # Optional environment variables
            #   NODE_ENV: production
            # HealthCheck: # Optional health check
            #   Path: /health
            #   Protocol: HTTP
            #   Interval: 30 # seconds
            #   Timeout: 5 # seconds
            #   UnhealthyThreshold: 3
            #   HealthyThreshold: 2
        # Uncomment and configure for ECR authentication if using a private ECR repo
        # AuthenticationConfiguration:
        #   AccessRoleArn: !GetAtt AppRunnerECRAccessRole.Arn
      InstanceConfiguration:
        Cpu: '1024' # 1 vCPU
        Memory: '2048' # 2 GB
      # AutoScalingConfigurationArn: !Ref AutoScalingConfig # Reference an existing auto-scaling config
      # VpcConnectorArn: !Ref MyVpcConnector # Reference a VPC connector for private access
      # ObservabilityConfiguration: # Enable X-Ray tracing
      #   TraceConfiguration:
      #     Vendor: AWSXRAY

  # Example: Define an Auto Scaling Configuration (if not referencing existing)
  # AutoScalingConfig:
  #   Type: AWS::AppRunner::AutoScalingConfiguration
  #   Properties:
  #     AutoScalingConfigurationName: my-app-scaling
  #     MinSize: 1
  #     MaxSize: 5
  #     MaxConcurrency: 100

Outputs:
  ServiceUrl:
    Description: URL of the App Runner Service
    Value: !GetAtt AppRunnerService.ServiceUrl
  ServiceArn:
    Description: ARN of the App Runner Service
    Value: !GetAtt AppRunnerService.ServiceArn
Auto Scaling and Concurrency
App Runner's auto-scaling is primarily driven by the
MaxConcurrencyAuto Scaling Configuration Example (JSON):
{
  "AutoScalingConfigurationName": "production-scale-config",
  "MinSize": 1,          // Minimum number of instances
  "MaxSize": 10,         // Maximum number of instances
  "MaxConcurrency": 100, // Scale up when requests per instance exceed this
  "ScaleInCooldown": 60, // Seconds to wait before scaling in after a scale-up event
  "ScaleOutCooldown": 60 // Seconds to wait before scaling out after a scale-down event
}
Considerations:
- is the most critical parameter. It defines when App Runner initiates a scale-out. A lower value leads to more frequent scaling but potentially faster response to traffic spikes.
MaxConcurrency - and
MinSizedefine the bounds. SettingMaxSizeto 0 can lead to cold starts if traffic is infrequent but can save costs.MinSize - and
ScaleInCooldownprevent rapid, flapping scaling events.ScaleOutCooldown
Networking and Security
VPC Configuration
To allow your App Runner service to access resources within your VPC (e.g., private databases, internal APIs), you must configure a VPC Connector.
VPC Connector CloudFormation Example:
Resources:
  MyVpcConnector:
    Type: AWS::AppRunner::VpcConnector
    Properties:
      VpcConnectorName: my-app-vpc-connector
      Subnets:
        - subnet-xxxxxxxxxxxxxxxxx # Specify subnet IDs
        - subnet-yyyyyyyyyyyyyyyyy
      SecurityGroups:
        - sg-zzzzzzzzzzzzzzzzz # Specify security group ID
      # Optional: VpcIngressSubnets (for inbound traffic from VPC to App Runner)
Key Points for VPC Connector:
- Subnet Selection: Choose subnets with appropriate routing to your target VPC resources. Ensure these subnets have sufficient available IP addresses.
- Security Groups: The security group attached to the VPC connector should allow outbound traffic to your VPC resources on the required ports. For inbound traffic from your VPC to App Runner, you might need to configure VPC ingress rules.
- IAM Role for ECR Access: If deploying from a private ECR repository, App Runner requires an IAM role with permissions to pull images (,
ecr:GetAuthorizationToken, etc.).ecr:BatchGetImage
IAM Configuration (ECR Pull Role Example)
{
    "Version": "2012-10-17",
    "Statement": [
        {
            "Effect": "Allow",
            "Action": [
                "ecr:GetAuthorizationToken",
                "ecr:BatchCheckLayerAvailability",
                "ecr:GetDownloadUrlForLayer",
                "ecr:BatchGetImage"
            ],
            "Resource": "*" // Best practice: Restrict to specific ECR repositories if possible
        }
    ]
}
Monitoring and Logging
App Runner integrates seamlessly with AWS monitoring services.
CloudWatch Integration
App Runner automatically sends application logs to CloudWatch Logs and publishes key operational metrics.
Example: Retrieving Request Count Metric using Boto3 (Python):
import boto3
import datetime

cloudwatch = boto3.client('cloudwatch')
service_name = 'my-production-api' # Replace with your App Runner service name

def get_apprunner_request_count(hours=1):
    """Fetches total request count for an App Runner service over a given period."""
    end_time = datetime.datetime.utcnow()
    start_time = end_time - datetime.timedelta(hours=hours)

    try:
        response = cloudwatch.get_metric_statistics(
            Namespace='AWS/AppRunner',
            MetricName='RequestCount',
            Dimensions=[
                {
                    'Name': 'ServiceName',
                    'Value': service_name
                }
            ],
            StartTime=start_time,
            EndTime=end_time,
            Period=300, # 5-minute intervals
            Statistics=['Sum']
        )
        total_requests = sum(d['Sum'] for d in response['Datapoints']) if response.get('Datapoints') else 0
        return total_requests
    except Exception as e:
        print(f"Error fetching metrics: {e}")
        return None

# Example usage:
# count = get_apprunner_request_count(hours=24)
# print(f"Total requests in the last 24 hours: {count}")
Custom Metrics via CloudWatch Embedded Metric Format (EMF)
For application-level metrics, leverage CloudWatch EMF for structured logging and metric extraction.
Example: Publishing Custom Metrics using EMF (Node.js):
Ensure you have the
@aws-lambda-powertools/logger// Example using AWS Lambda Powertools for Logging (can be adapted for App Runner) // npm install @aws-lambda-powertools/logger const { Logger } = require('@aws-lambda-powertools/logger'); const logger = new Logger({ serviceName: 'my-custom-app' }); async function processOrder(orderId) { try { // Simulate processing logic... const processed = Math.random() > 0.1; // 90% success rate if (processed) { logger.info('Order processed successfully', { orderId: orderId, customDimensions: { Service: 'my-production-api' } // Custom dimensions for metrics }); // Publish a custom metric logger.metrics.putMetric('OrderProcessingSuccess', 1, 'Count'); return { success: true, orderId }; } else { throw new Error('Order processing failed'); } } catch (error) { logger.error('Failed to process order', { orderId: orderId, errorMessage: error.message, customDimensions: { Service: 'my-production-api' } }); // Publish a custom metric logger.metrics.putMetric('OrderProcessingFailed', 1, 'Count'); throw error; } } // Example usage within your express app: // app.post('/orders', async (req, res) => { // try { // const result = await processOrder(req.body.orderId); // res.status(200).json(result); // } catch (err) { // res.status(500).json({ error: 'Internal Server Error' }); // } // });
Key Points for Monitoring:
- Standard Metrics: Utilize built-in metrics like ,
RequestCount,HealthCheckStatus,MemoryUtilization.CpuUtilization - Structured Logging: Implement structured logging (e.g., JSON) within your application. App Runner automatically extracts metrics from logs formatted using CloudWatch Embedded Metric Format (EMF).
- X-Ray Integration: Enable AWS X-Ray tracing for end-to-end request tracing across your application and other AWS services.
CI/CD Integration
Automating deployments is crucial for agile development. App Runner integrates well with CI/CD pipelines.
GitHub Actions Workflow Example
This workflow demonstrates building a Docker image, pushing it to ECR, and then updating the App Runner service.
name: Deploy to App Runner from ECR

on:
  push:
    branches: [ main ] # Trigger on push to main branch

jobs:
  deploy:
    runs-on: ubuntu-latest
    permissions:
      contents: read
      packages: write # Required for ECR login actions

    steps:
    - name: Checkout code
      uses: actions/checkout@v4

    - name: Configure AWS credentials
      uses: aws-actions/configure-aws-credentials@v4
      with:
        aws-access-key-id: ${{ secrets.AWS_ACCESS_KEY_ID }}
        aws-secret-access-key: ${{ secrets.AWS_SECRET_ACCESS_KEY }}
        aws-region: us-east-1 # Replace with your AWS region

    - name: Login to Amazon ECR
      id: login-ecr
      uses: aws-actions/amazon-ecr-login@v2

    - name: Build, tag, and push Docker image to ECR
      env:
        ECR_REGISTRY_URI: ${{ steps.login-ecr.outputs.registry }}
        ECR_REPOSITORY_NAME: my-app-repo # Your ECR repository name
        IMAGE_TAG: ${{ github.sha }} # Use commit SHA as image tag for traceability
      run: |
        # Build the Docker image
        docker build -t $ECR_REGISTRY_URI/$ECR_REPOSITORY_NAME:$IMAGE_TAG .

        # Push the Docker image to ECR
        docker push $ECR_REGISTRY_URI/$ECR_REPOSITORY_NAME:$IMAGE_TAG
        echo "::set-output name=image_uri::$ECR_REGISTRY_URI/$ECR_REPOSITORY_NAME:$IMAGE_TAG"

    - name: Update AWS App Runner service
      env:
        APPRUNNER_SERVICE_ARN: ${{ secrets.APPRUNNER_SERVICE_ARN }} # ARN of your App Runner service
      run: |
        aws apprunner update-service \
          --service-arn $APPRUNNER_SERVICE_ARN \
          --source-configuration '{"ImageRepository":{"ImageIdentifier":"'${{ steps.login-ecr.outputs.registry }}/${{ env.ECR_REPOSITORY_NAME }}:${{ env.IMAGE_TAG }}'"}}'
        echo "App Runner service updated to image: ${{ steps.login-ecr.outputs.registry }}/${{ env.ECR_REPOSITORY_NAME }}:${{ env.IMAGE_TAG }}"
Key Points for CI/CD:
- Image Tagging: Use immutable tags (e.g., Git commit SHA) for deployments to ensure you can roll back to a specific version.
- Secrets Management: Store AWS credentials and service ARNs securely using the CI/CD platform's secrets management features.
- Idempotency: Ensure your deployment script is idempotent; running it multiple times should result in the same state.
Performance Optimization
Optimizing your App Runner service involves configuring resources and implementing application-level caching.
1. Resource Configuration
Choosing appropriate CPU and Memory values is crucial for performance and cost.
Example CloudFormation with Optimized Resources:
Resources:
  AppRunnerService:
    Type: AWS::AppRunner::Service
    Properties:
      # ... other properties
      InstanceConfiguration:
        Cpu: '1024'      # 1 vCPU: Good balance for many web applications
        Memory: '2048'   # 2 GB: Sufficient for moderate traffic and typical application stacks
      # Consider AutoScalingConfiguration for dynamic resource adjustment
      # AutoScalingConfigurationArn: !Ref AutoScalingConfig
      HealthCheckConfiguration: # Essential for reliable service operation
        Path: '/health'      # Endpoint to check service health
        Protocol: 'HTTP'     # Or 'HTTPS', 'TCP'
        Interval: 30         # Seconds between health checks
        Timeout: 5           # Seconds to wait for a response
        HealthyThreshold: 2  # Consecutive successful checks to be considered healthy
        UnhealthyThreshold: 3 # Consecutive failed checks to be considered unhealthy
Tuning Strategy:
- Start Lean: Begin with smaller configurations (e.g., 512 CPU, 1024 Memory) and monitor performance.
- Monitor Metrics: Observe and
CpuUtilizationmetrics in CloudWatch. If consistently high (>80%), consider scaling up.MemoryUtilization - Test Under Load: Use load testing tools to simulate realistic traffic patterns and identify bottlenecks.
- Health Checks: A robust health check endpoint is critical. It should verify application health, not just if the process is running.
2. Application-Level Caching
Implementing caching strategies within your application can significantly reduce latency and backend load.
Example: In-Memory Cache (Node.js with Express):
const express = require('express');
const app = express();
// Consider a more robust caching library for production, e.g., 'cache-manager'
const mcache = require('memory-cache');
const port = process.env.PORT || 8080;

// Function to simulate a time-consuming data fetch
function fetchDataFromDatabase(query) {
  return new Promise(resolve => {
    setTimeout(() => {
      resolve({ data: `Results for ${query}`, timestamp: new Date() });
    }, 1000); // Simulate 1-second database latency
  });
}

app.get('/api/data', async (req, res) => {
  const cacheKey = `/api/data?${JSON.stringify(req.query)}`; // Cache based on URL and query params
  const cachedData = mcache.get(cacheKey);

  if (cachedData) {
    console.log('Cache hit for:', cacheKey);
    return res.json(cachedData);
  }

  console.log('Cache miss for:', cacheKey);
  try {
    const responseData = await fetchDataFromDatabase(req.query.q || 'default');

    // Cache the response for 5 minutes (300,000 milliseconds)
    mcache.put(cacheKey, responseData, 300000);

    res.json(responseData);
  } catch (error) {
    console.error("Error fetching data:", error);
    res.status(500).json({ error: 'Failed to retrieve data' });
  }
});

app.listen(port, () => {
  console.log(`Server running on port ${port}`);
});
Caching Strategies:
- Memory Cache: Simple for in-memory data, but limited by instance memory and not shared across instances.
- Distributed Cache: Use services like Redis (ElastiCache) or Memcached for shared, scalable caching.
- CDN: For static assets or cacheable API responses, use Amazon CloudFront.
Cost Optimization
Optimizing costs involves intelligent auto-scaling and efficient resource utilization.
1. Auto Scaling Configuration for Cost Savings
Adjusting scaling parameters can directly impact your AWS bill.
Cost-Optimized Auto Scaling Configuration Example (JSON):
{
  "AutoScalingConfigurationName": "cost-optimized-config",
  "MinSize": 1,        // Keep at least one instance running if constant availability is needed
  "MaxSize": 5,        // Limit the maximum number of instances to prevent runaway costs
  "MaxConcurrency": 150, // Increase concurrency threshold to reduce scaling frequency if acceptable
  "ScaleInCooldown": 120, // Longer cooldown can help consolidate instances
  "ScaleOutCooldown": 120
}
Strategies:
- Lower : Restrict the maximum number of instances.
MaxSize - Higher : Allow more requests per instance before scaling out, reducing instance count.
MaxConcurrency - = 0: If your application can tolerate occasional cold starts, setting
MinSizeto 0 can save costs during periods of zero traffic.MinSize - Scheduled Scaling: App Runner does not directly support scheduled scaling. For predictable traffic patterns, consider