How to Host a Static Website on AWS S3 (Step-by-Step Guide)
Learn how to host your static website on Amazon S3, configure permissions, and set up custom domains with CloudFront.
Hosting Static Websites on AWS S3 with CloudFront: A Comprehensive Guide
TL;DR
This guide provides a detailed walkthrough for hosting static websites on AWS S3, leveraging CloudFront for global content delivery, HTTPS, custom domains, and performance optimization. It covers S3 bucket configuration, content uploading, CloudFront distribution setup, Route 53 DNS management, security best practices, cost considerations, and common troubleshooting scenarios. The recommended architecture prioritizes scalability, security, and cost-efficiency for modern static web applications.
Introduction
This document outlines the process of deploying and managing a static website using Amazon S3 for storage and CloudFront as a Content Delivery Network (CDN). This approach offers significant advantages in terms of availability, scalability, performance, and cost-effectiveness compared to traditional web hosting methods. We will cover the entire lifecycle, from initial setup to advanced configurations and ongoing maintenance.
Prerequisites
Essential AWS Services and Tools
| Requirement | Purpose | Notes | | :---------------- | :------------------------------------ | :------------------------------------------ | | AWS Account | Access to AWS services | Free tier eligibility applies for many services | | AWS CLI v2 | Command-line interface for AWS | Recommended for automation and scripting | | Domain Name | Custom URL for your website | Can be managed via Route 53 or external registrars | | Static Website | HTML, CSS, JavaScript, image files | Minification and optimization are key | | Index Document |
index.htmlerror.htmlWebsite Assets Preparation
| File Type | Required | Best Practice | | :------------- | :------- | :------------------------------------------------------ | | HTML | Yes | Minified, compressed (e.g., Gzip, Brotli) | | CSS | Yes | Bundled, minified, compressed | | JavaScript | Yes | Bundled, minified, compressed, consider code splitting | | Images | Yes | Optimized (e.g., WebP, JPEG), compressed | | Fonts | Optional | WOFF2 format for modern browsers, consider self-hosting |
1. S3 Bucket Setup for Static Website Hosting
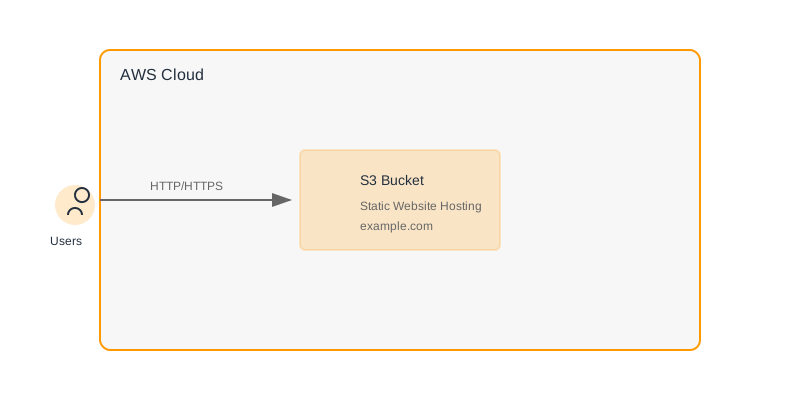
This section details the creation and configuration of an S3 bucket to serve static website content.
Creating an S3 Bucket
AWS CLI:
aws s3api create-bucket \
    --bucket your-unique-website-bucket-name \
    --region us-east-1 \
    --create-bucket-configuration LocationConstraint=us-east-1 # Omit for us-east-1
AWS Management Console: Navigate to S3, click "Create bucket," provide a globally unique name, select a region, and choose to block all public access (this will be reconfigured via bucket policy for website hosting).
Enabling Static Website Hosting
Configure the bucket to serve files as a website.
AWS CLI:
aws s3api put-bucket-website \
    --bucket your-unique-website-bucket-name \
    --website-configuration '{
        "IndexDocument": {"Suffix": "index.html"},
        "ErrorDocument": {"Key": "error.html"}
    }'
AWS Management Console: In the bucket's properties, find "Static website hosting," enable it, specify
index.htmlerror.htmlBucket Policy for Public Read Access
To allow unauthenticated access to your website files, apply a bucket policy.
AWS CLI:
aws s3api put-bucket-policy \
    --bucket your-unique-website-bucket-name \
    --policy '{
        "Version": "2012-10-17",
        "Statement": [
            {
                "Sid": "PublicReadGetObject",
                "Effect": "Allow",
                "Principal": "*",
                "Action": "s3:GetObject",
                "Resource": "arn:aws:s3:::your-unique-website-bucket-name/*"
            }
        ]
    }'
Important: This policy makes objects publicly readable. For production environments using CloudFront, it's recommended to restrict direct S3 access and use CloudFront Origin Access Identity (OAI) or Origin Access Control (OAC) for more secure access. This public policy is for simplicity in the initial S3 website endpoint testing phase.
CORS Configuration (If Required)
If your website needs to access resources from different domains (e.g., APIs), configure Cross-Origin Resource Sharing (CORS).
AWS CLI:
aws s3api put-bucket-cors \
    --bucket your-unique-website-bucket-name \
    --cors-configuration '{
        "CORSRules": [
            {
                "AllowedOrigins": ["http://localhost:3000", "https://your-domain.com"],
                "AllowedMethods": ["GET"],
                "MaxAgeSeconds": 3000,
                "AllowedHeaders": ["*"]
            }
        ]
    }'
Note: Adjust
AllowedOriginsAllowedMethods2. Uploading Website Content
Transfer your static assets to the configured S3 bucket.
File Organization Strategy
A typical project structure:
your-website-root/
├── index.html
├── error.html
├── assets/
│   ├── css/
│   │   └── styles.min.css
│   ├── js/
│   │   └── main.bundle.js
│   └── images/
│       └── logo.webp
├── about/
│   └── index.html # Accessible at /about/
└── contact/
    └── index.html # Accessible at /contact/
Key Principle: S3 treats objects as files. The directory structure in your upload maps directly to URL paths. For example,
about/index.htmlyour-bucket-url/about/Uploading Files with AWS CLI
The
aws s3 sync# Navigate to your website's root directory in the terminal cd your-website-root/ aws s3 sync . s3://your-unique-website-bucket-name \ --acl public-read \ # If using S3 website endpoint directly (not recommended with CloudFront OAC/OAI) --exclude "*.DS_Store" \ --exclude "node_modules/*" \ --cache-control "max-age=3600" \ # Default cache for most files --content-type "text/html" --exclude "*" --include "*.html" \ --content-type "text/css" --exclude "*" --include "*.css" \ --content-type "application/javascript" --exclude "*" --include "*.js" \ --content-type "image/webp" --exclude "*" --include "*.webp" \ --content-type "image/jpeg" --exclude "*" --include "*.jpg" --include "*.jpeg" \ --content-type "image/png" --exclude "*" --include "*.png"
Explanation of Flags:
- : Sync from the current local directory.
. - : The target S3 bucket.
s3://your-unique-website-bucket-name - : Grants public read access to uploaded objects. Deprecated in favor of bucket policies and CloudFront OAC/OAI.
--acl public-read - /
--exclude: Fine-tune which files are uploaded.--include - : Sets the
--cache-controlHTTP header. Essential for performance.Cache-Control - : Explicitly sets the
--content-typeheader, crucial for browsers to render files correctly. MultipleContent-Typeand--includepairs are used to apply specific types.--content-type
Note on public-read
GetObjectContent Type and Cache-Control Best Practices
| File Extension |
Content-TypeCache-Control.htmltext/htmlno-cache, max-age=0.csstext/csspublic, max-age=604800, immutableimmutable.jsapplication/javascriptpublic, max-age=604800, immutableimmutable.jpg.jpegimage/jpegpublic, max-age=31536000, immutable.pngimage/pngpublic, max-age=31536000, immutable.webpimage/webppublic, max-age=31536000, immutable.svgimage/svg+xmlpublic, max-age=31536000, immutablefont/woff2font/ttfpublic, max-age=31536000, immutableCache Busting: For immutable assets (CSS, JS, images), append a version hash to the filename (e.g.,
styles.a1b2c3d4.css3. CloudFront Distribution Setup
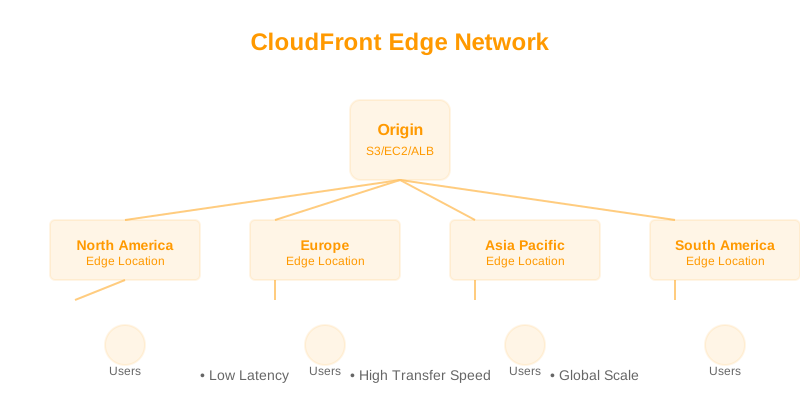
CloudFront acts as the global front-end, caching content at edge locations and serving it to users with low latency.
Creating a CloudFront Distribution
- Origin Domain: Select your S3 bucket from the dropdown. Do NOT use the S3 website endpoint URL here if you plan to use OAC/OAI. CloudFront will automatically populate it.
- Origin Access:
- Recommended: Choose "Origin access control settings (recommended)." Create a new OAC. This will generate a policy statement that you'll need to apply to your S3 bucket policy, granting CloudFront read access.
- Legacy: Use "Legacy access identities" and create an OAI if necessary.
- Viewer Protocol Policy: Select "Redirect HTTP to HTTPS."
- Allowed HTTP Methods: Select "GET, HEAD, OPTIONS."
- Cache Policy: Use for most static sites. You can create a custom policy for finer control.
CachingOptimized - Price Class: "Use all edge locations" for maximum performance and availability globally.
- Alternate Domain Names (CNAMEs): Add your custom domain(s) (e.g., ,
example.com).www.example.com - Custom SSL Certificate: Select an ACM certificate for your custom domain (see Section 4).
- Default Root Object: Enter . This ensures requests to
index.htmlare served by/.index.html - Security Headers: Consider adding security headers via CloudFront Functions or Lambda@Edge (more on this in Advanced Configuration).
AWS CLI (Conceptual - requires aws cloudfront create-distribution
// distribution-config.json (simplified example)
{
    "CallerReference": "your-unique-ref-id",
    "DistributionConfig": {
        "Origins": {
            "Quantity": 1,
            "Items": [
                {
                    "Id": "S3-your-unique-website-bucket-name",
                    "DomainName": "your-unique-website-bucket-name.s3.amazonaws.com", // Use S3 API endpoint, not website endpoint
                    "S3OriginConfig": {
                        "OriginAccessIdentity": "origin-access-identity/cloudfront/E1111222333444" // Replace with your OAI if using legacy
                    }
                }
            ]
        },
        "DefaultCacheBehavior": {
            "TargetOriginId": "S3-your-unique-website-bucket-name",
            "ViewerProtocolPolicy": "redirect-to-https",
            "AllowedMethods": {
                "Quantity": 2,
                "Items": ["GET", "HEAD"],
                "CachedMethods": {
                    "Quantity": 2,
                    "Items": ["GET", "HEAD"]
                }
            },
            "CachePolicyId": "658327ea-f89d-4fab-a63d-7e88632e7e9f" // Managed-CachingOptimized
        },
        "Aliases": {
            "Quantity": 2,
            "Items": ["example.com", "www.example.com"]
        },
        "DefaultRootObject": "index.html",
        "Enabled": true,
        "ViewerCertificate": {
            "ACMCertificateArn": "arn:aws:acm:us-east-1:123456789012:certificate/your-certificate-id",
            "SSLSupportMethod": "sni-only",
            "MinimumProtocolVersion": "TLSv1.2_2021"
        },
        "HttpVersion": "http2"
    }
}
After creating the distribution, CloudFront will provision it globally, which can take several minutes. Note the Distribution Domain Name (e.g.,
d123abc.cloudfront.netS3 Bucket Policy Update for OAC/OAI
If you chose OAC or OAI, update your S3 bucket policy to grant CloudFront access:
Example OAC Policy:
{
    "Version": "2012-10-17",
    "Statement": [
        {
            "Sid": "GrantCloudFrontRead",
            "Effect": "Allow",
            "Principal": {
                "Service": "cloudfront.amazonaws.com"
            },
            "Action": "s3:GetObject",
            "Resource": "arn:aws:s3:::your-unique-website-bucket-name/*",
            "Condition": {
                "StringEquals": {
                    "AWS:SourceArn": "arn:aws:cloudfront::123456789012:distribution/YOUR_CLOUDFRONT_DISTRIBUTION_ID"
                }
            }
        }
    ]
}
Replace
123456789012YOUR_CLOUDFRONT_DISTRIBUTION_ID4. Custom Domain and HTTPS Configuration
This section covers mapping your custom domain to the CloudFront distribution and enabling HTTPS.
Requesting an SSL/TLS Certificate with AWS Certificate Manager (ACM)
- Region: Request the certificate in the region for CloudFront.
us-east-1 - Domain Names: Enter your root domain (e.g., ) and any subdomains (e.g.,
example.com).www.example.com - Validation Method: Choose "DNS validation" for automated validation via Route 53.
- Create Records in Route 53: ACM will provide CNAME records. If your domain is managed by Route 53, ACM can often create these records for you automatically. Otherwise, manually add them to your DNS provider.
Once the certificate status is "Issued," it's ready to be used with CloudFront.
Configuring DNS with Route 53
If you are using Route 53 as your DNS provider:
- Hosted Zone: Ensure you have a hosted zone for your domain (e.g., ).
example.com - Create Records:
- For the root domain ():
example.com- Record Type:
A - Alias: Yes
- Route traffic to: Alias to CloudFront distribution.
- Choose Distribution: Select your CloudFront distribution from the dropdown.
- Routing Policy: Simple routing (or weighted/latency if applicable).
- Record Type:
- For the subdomain (
www):www.example.com- Record Type:
A - Alias: Yes
- Route traffic to: Alias to CloudFront distribution.
- Choose Distribution: Select your CloudFront distribution.
- Record Type:
- For the root domain (
If using an external DNS provider:
- Root Domain: Use an or
ALIASrecord if supported by your provider, pointing to the CloudFront Distribution Domain Name. If not supported, you cannot easily point the root domain directly.ANAME - Subdomain: Create a
wwwrecord forCNAMEpointing to your CloudFront Distribution Domain Name (e.g.,www).d123abc.cloudfront.net
Note on DNS Propagation: DNS changes can take time to propagate globally (from minutes to 48 hours).
5. Advanced Configuration and Security
Enhance your static website's security and functionality.
Implementing Security Headers
Security headers help mitigate common web vulnerabilities. These can be implemented using CloudFront Functions (preferred for performance and cost) or Lambda@Edge.
Example CloudFront Function (Viewer Request):
// viewer-response.js
function handler(event) {
    const response = event.response;
    const headers = response.headers;

    // Add Security Headers
    headers['strict-transport-security'] = { value: 'max-age=31536000; includeSubdomains; preload' };
    headers['content-security-policy'] = { value: "default-src 'self'; img-src 'self' data:; font-src 'self'; style-src 'self'; script-src 'self';" }; // Adjust directives as needed
    headers['x-content-type-options'] = { value: 'nosniff' };
    headers['x-frame-options'] = { value: 'DENY' };
    headers['x-xss-protection'] = { value: '1; mode=block' };
    headers['referrer-policy'] = { value: 'strict-origin-when-cross-origin' };

    return response;
}
Associate this function with your CloudFront distribution's cache behavior for "Viewer Response" events.
Custom Error Responses
Configure CloudFront to serve custom error pages for specific HTTP status codes.
- In your CloudFront distribution settings, go to "Error Pages."
- Click "Create custom error response."
- HTTP Error Code: Select (Forbidden) or
403(Not Found).404 - Customize Error Response: Yes.
- Response Page Path: Enter the path to your custom error file (e.g., or
/error.html)./404.html - HTTP Response Code: Keep the original code or set it to if you want the error page to appear as a successful load (use with caution, can impact SEO and analytics). Usually, keep the original error code.
200
AWS WAF Integration
For advanced protection against common web exploits (SQL injection, cross-site scripting), integrate AWS WAF with your CloudFront distribution. Create WAF Web ACLs and associate them with your CloudFront distribution.
6. Performance Optimization
Maximize website speed and responsiveness.
CloudFront Cache Behaviors for Fine-Grained Control
Create multiple cache behaviors to apply different caching rules based on path patterns.
| Path Pattern | Origin Request Policy | Cache Policy | TTL (Min/Max/Default) | Compression | Notes | | :------------------ | :-------------------- | :------------------- | :-------------------- | :---------- | :--------------------------------------------------- | |
/assets/images/*CachingOptimized31536000/31536000/31536000immutable/assets/css/*CachingOptimized604800/604800/604800immutable/assets/js/*CachingOptimized604800/604800/604800immutable*.htmlManaged-BypassCache0/0/0*Managed-BypassCache0/0/0Origin Request Policy:
- : Forward all headers, cookies, and query strings.
AllViewer - (managed policy): Only forwards necessary headers/cookies for caching. Use this unless specific dynamic behavior is needed.
CacheOptimized - Custom: Define precisely what to forward. For static sites, often minimal forwarding is required for cache hits.
Compression: Enable compression (Gzip and Brotli) within CloudFront cache policies for text-based assets (
.html.css.jsImage Optimization Strategies
- Format Conversion: Use modern formats like WebP for smaller file sizes with comparable quality.
- Compression: Employ tools like ,
imagemin,jpegoptim, or cloud-based image optimization services.pngquant - Responsive Images: Use the element or
<picture>attribute in HTML to serve appropriately sized images based on the viewport.srcset
Lazy Loading
Implement lazy loading for images and other media that are below the fold to improve initial page load time.
// Example using Intersection Observer API
document.addEventListener("DOMContentLoaded", function() {
    var lazyImages = document.querySelectorAll("img.lazy");
    if ("IntersectionObserver" in window) {
        let lazyImageObserver = new IntersectionObserver(function(entries, observer) {
            entries.forEach(function(entry) {
                if (entry.isIntersecting) {
                    let lazyImage = entry.target;
                    lazyImage.src = lazyImage.dataset.src;
                    lazyImage.classList.remove("lazy");
                    lazyImageObserver.unobserve(lazyImage);
                }
            });
        });

        lazyImages.forEach(function(lazyImage) {
            lazyImageObserver.observe(lazyImage);
        });
    } else {
        // Fallback for older browsers
        lazyImages.forEach(function(lazyImage) {
            lazyImage.src = lazyImage.dataset.src;
            lazyImage.classList.remove("lazy");
        });
    }
});
<img data-src="path/to/your/image.jpg" src="placeholder.gif" alt="Description" class="lazy">
7. Monitoring, Analytics, and Logging
Understand your website's performance and usage.
CloudWatch Metrics for CloudFront
CloudFront automatically sends metrics to CloudWatch. Key metrics to monitor:
| Metric Name | Description | Threshold/Alerting | | :----------------- | :--------------------------------------------------- | :------------------------------------------------ | |
RequestsBytesDownloaded4xxErrorRate5xxErrorRateCacheHitRateAccess Logs
Enable CloudFront access logs to capture detailed information about each request. These logs are delivered to an S3 bucket.
- In your CloudFront distribution settings, under "Logging," enable logging.
- Specify an S3 bucket for log delivery.
- Choose a log prefix (e.g., ).
cloudfront-logs/
Analyzing these logs can provide insights into traffic sources, user agents, referrers, and more. Tools like Amazon Athena can query these logs directly from S3.
Website Analytics
Integrate a web analytics service (e.g., Google Analytics, Plausible, Matomo) by adding their tracking script to your
index.html8. Cost Management
Optimize AWS costs for your static website.
Cost Optimization Strategies
- S3 Storage Class: Use S3 Standard for frequently accessed assets. Consider S3 Intelligent-Tiering if access patterns are unpredictable.
- S3 Lifecycle Policies: Implement policies to transition older, less accessed data to cheaper storage classes (e.g., S3 Glacier) or expire it.
- CloudFront Price Class: "Use all edge locations" provides the best performance but can be more expensive than regional options. Evaluate based on your target audience's geographic